Personalized “Baked By” Rolling Pin Engraving Template
 Denise Ortakales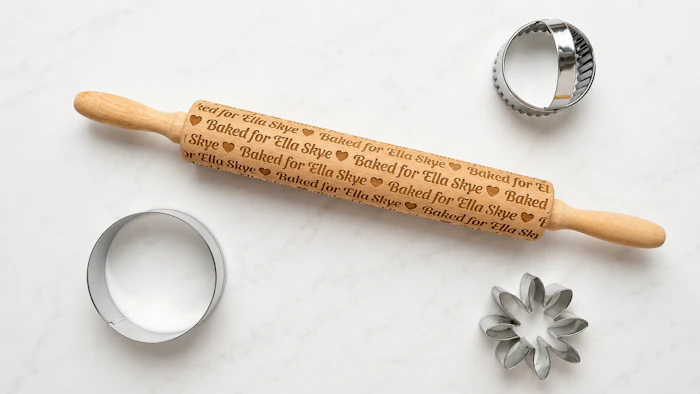
Create a personalized repeating design sized for your cylindrical rolling pin. Enter your pin measurements, choose the wording, name, font, and separator symbol, then download the finished engraving artwork.
Click here for more information on engraving with a rotary attachment.
Before downloading the final design, follow the instructions below and run the circumference test. The design should be downloaded again after any measurement adjustment.
Important: Run the included Circumference Test before engraving the final design. Small differences in your measurement or rotary setup can affect how the two ends meet.
These instructions describe the general workflow used during testing. Rotary setup, measurement entry, orientation, and calibration vary by machine and software, so follow the instructions supplied with your own rotary attachment.
Before You Begin
Measure only the straight engravable barrel, not the handles or tapered ends.
You will need:
the engraveable barrel length
the barrel circumference
a rotary attachment suitable for your laser
1.5" blue painters tape for testing
A flexible measuring tape
Measure the circumference with a flexible measuring tape or a narrow strip of paper, then measure that strip with a ruler. Enter measurements in inches.
Customize the Design
Choose a Lead Phrase from the menu.
Enter the Personalized Name.
Choose one of the recommended Font Choices.
Choose a simple Separator Symbol. by clicking on the Paw Print
Use a bold, uncomplicated separator such as a solid heart, paw print or star. You can also search for a solid circle or diamond. Fine-lined or highly detailed icons may not engrave cleanly at this size.
The preview updates automatically as you make changes.
Enter the Rolling Pin Measurements
Enter the Engravable Barrel Length.
Enter the Barrel Circumference.
The design will resize automatically to match those measurements.
This template is intended for a straight cylindrical barrel. It is not designed for tapered, bowed, or irregularly shaped rolling pins.
Run the Circumference Test First
Download the circumference test strip below before engraving the full design.
Confirm that the Barrel Circumference matches your rolling pin. The test strip will automatically resize to that measurement.
Click Download SVG in the test-strip preview above.
Open the SVG in your laser software.
Remove the handles from the rolling pin, if applicable.
Wrap the barrel with 1.5-inch blue masking tape for testing.
Position the test strip around the barrel at the same area where the design will be engraved.
Run the test at low power using your normal rotary setup.
Check whether the beginning and end of the test strip align.
If the ends overlap or leave a gap, recheck your circumference measurement and rotary settings before engraving the full design.
The test strip helps confirm the setup, but laser and rotary calibration can vary by machine.
Choose the Correct Text Direction
Use Reverse for Embossing when the rolling pin will be used to press readable words into dough.
Checked: the engraving artwork is reversed so the dough impression reads correctly.
Unchecked: the engraving itself reads normally, which may be preferred for a decorative or display rolling pin.
Check the preview before downloading to confirm the text direction you need.
Download the Final Engraving File
Review the personalized rolling pin design in the preview above.
Confirm the name, lead phrase, separator symbol, font, barrel measurements, and text direction.
If the rolling pin will be used to emboss readable text into dough, make sure Reverse for Embossing is checked.
Click Download SVG in the preview above.
Import the SVG into your laser software without resizing it.
Confirm that the imported artwork matches the entered Engravable Barrel Length and Barrel Circumference before engraving.
Engraving Notes
Laser settings and rotary setup vary by machine, wood species, blank manufacturer, and rotary attachment. Always run the circumference test and a small engraving test before committing to the full rolling pin.
Use settings appropriate for your machine and material. Make sure the rolling pin is securely supported and can rotate freely without the handles or frame interfering.
This template creates the artwork only; it does not configure your laser’s rotary settings, steps per rotation, focus, speed, or power.
After Engraving
Laser engraving can leave loose soot, smoke residue, and fine wood dust in the recessed areas. Before using the rolling pin with food:
Remove loose residue with a soft, dry brush. A clean toothbrush works well for the engraved details.
Vacuum or blow away the loosened dust.
Wipe the barrel with a slightly damp, lint-free cloth. Repeat with a clean area of the cloth until it no longer picks up dark residue.
Allow the rolling pin to dry completely.
If the engraving feels rough, sand it very lightly with fine-grit sandpaper, following the grain, then brush and wipe it again.
Apply a light coat of food-grade mineral oil or butcher-block conditioner if the wood is unfinished. Wipe away all excess and allow it to absorb fully before use.
Do not soak the rolling pin or use bleach, harsh cleaners, or a dishwasher. Make sure no visible soot or loose residue remains before the pin touches dough.
First-use note: Even after thorough cleaning, a newly engraved rolling pin may transfer a smoky or burnt-wood odor or flavor to the first batch of dough. Treat the first batch as a conditioning/test batch and discard it rather than eating it. If the dough picks up visible dark residue, continue brushing and wiping the engraving until a clean cloth no longer shows soot before using the pin again.
Choosing a Cookie Dough
For the clearest impressions, use a firm, low-spread cookie dough intended for embossed or stamped cookies. Avoid recipes containing large mix-ins, such as chocolate chips or nuts, because they can interfere with the engraved pattern.
Chill the dough before and after cutting. Lightly flour the dough, not the rolling pin, and use even pressure. The finished impression may vary depending on the recipe, dough thickness, and depth of the engraving.
Cleaning and Care
After use, brush away loose flour and dough with a soft, dry brush. If needed, wipe the rolling pin with a damp cloth and a small amount of mild dish soap.
Do not soak the rolling pin or leave it standing in water. Do not place it in the dishwasher. Dry it thoroughly and allow it to air-dry completely before storing.
When the wood begins to look dry or dull, apply a light coat of food-grade mineral oil or butcher-block oil. Wipe away any excess and let the pin dry before using it again. Avoid ordinary cooking oils, which can become rancid over time.
Store the rolling pin in a dry location away from prolonged heat or direct sunlight. Deeply engraved areas may hold flour, so clean them gently with a soft brush rather than using sharp tools.
The mild soap, thorough drying, and food-contact-safe oil guidance is consistent with standard care advice for wooden kitchen tools and rolling pins.
Rotary Attachment Notes
Rotary attachments vary by manufacturer, machine, and laser software. This template was tested using a Trotec cone-style rotary attachment, but it may also be used with other rotary systems when they are properly configured.
The two most common general styles are:
Chuck, cone, or clamp-style rotary
The object is held at one or both ends and rotated around a fixed axis. These systems generally hold the object securely and are often a good choice for tapered glasses, handled mugs, or items that might slip on rollers.
Roller-style rotary
The object rests on driven rollers that turn the outside surface. Roller systems are convenient for straight, evenly shaped objects, but tapered, lightweight, or slippery items may wander or slip during engraving. LightBurn notes that roller rotaries work best with cylindrical objects and can be more difficult to calibrate for full-wrap engraving, while chuck systems physically hold the item and rotate it around a known axis.
Some manufacturers also offer tilting, interchangeable, or combination systems. Trotec, for example, offers cone, roller, tiltable, and combined rotary configurations for different object shapes and sizes.
Before engraving:
Choose the correct rotary type in your laser software, when that setting is available.
Enter the measurements and calibration values required by your particular rotary.
Follow the rotary manufacturer’s instructions for steps per rotation, roller diameter, object diameter, or circumference.
Make sure the object rotates smoothly without slipping, wobbling, or moving sideways.
Use your laser software’s frame or outline function to check placement before engraving.
Rotary terminology and required measurements differ between systems. For example, LightBurn distinguishes between chuck and roller rotaries and notes that steps per revolution refer to a full rotation of the chuck on a chuck system, but a full rotation of the driven roller—not the object—on a roller system.
Useful troubleshooting tips by rotary style
If using a roller rotary
These are reasonable practical suggestions:
Place nonslip shelf liner, silicone bands, or rubber bands where appropriate to improve traction.
Add weight inside a lightweight tumbler, provided it can be secured and does not strain the rotary.
Use a support wheel or steady rest at the unsupported end.
Make sure seams, handles, ridges, and flared rims do not pass over the drive rollers.
Watch for gradual sideways movement during a test rotation.
Clean dust and residue from both the glass and rollers.
However, I would call these possible aids, not guaranteed fixes. Added grip or weight can also change how an object tracks or increase the load on the motor.
If using a chuck or cone rotary
Protect delicate glass from excessive clamping pressure.
Make sure the object is centered and held squarely.
Support the free end so its weight does not pull the object off-axis.
Confirm that the chuck, cone, or plug cannot loosen during repeated rotation.
For open glasses, a cone generally centers the opening well, but unusually shaped rims may need a custom insert or jig.
If engraving a tapered object
Regardless of rotary style:
Level the engraving surface so it stays as parallel as possible to the laser’s travel.
Focus near the center of the engraving area.
Expect some variation when the circumference changes substantially across a tall design.
Use a narrow design or test piece before committing to a large full wrap.
On a roller rotary, taper may cause the object to “walk” sideways; stops or supports may help, but they must not prevent free rotation.
Which rotary is “best”?
Roller rotary: easiest and often least expensive for straight, uniform cylinders.
Chuck or cone rotary: usually more secure for taper, irregular shapes, and full wraps.
Tilting rotary: helpful when the engraving surface must be leveled on tapered objects.
Custom jig or insert: sometimes necessary for unusual rims, narrow openings, handles, or fragile pieces.
The best rotary is the one that securely holds the particular blank, rotates it consistently, and works correctly with the user’s laser and software.
Photo note: Background and lighting were digitally enhanced. The engraved designs shown are photographs of the completed physical samples.